A Sweet History: Sugar Cookies and Decorating
Sugar cookies and decorating – Sugar cookies, those delightful discs of sweetness, have a rich and surprisingly long history, evolving from simple spiced breads to the intricately decorated masterpieces we enjoy today. This journey explores the history, techniques, and artistry behind these beloved treats, guiding you from basic baking to advanced decorating skills.
The Evolution of Sugar Cookies and Decorating Techniques
The earliest forms of sugar cookies weren’t the delicate creations we know today. Early versions, dating back centuries, were often spiced biscuits or simple sweetened cookies. The addition of sugar, as a readily available ingredient, marked a significant shift. Early European settlers brought variations of these recipes to the Americas, leading to regional differences. Decorating techniques evolved slowly, initially involving simple markings with a fork or knife.
The introduction of royal icing in the 19th century revolutionized decorating, allowing for intricate designs and the use of various tools. Modern techniques, including airbrushing and the use of edible images, offer even greater creative possibilities.
A timeline of key milestones might include: Early spiced biscuits (pre-17th century), introduction of refined sugar leading to sweeter cookies (17th-18th centuries), rise of royal icing and more elaborate designs (19th century), widespread availability of decorating tools (20th century), and the emergence of advanced techniques like airbrushing (late 20th – 21st centuries). Early designs often reflected cultural symbolism, such as religious motifs or seasonal imagery.
For example, gingerbread cookies, a close relative, frequently featured religious scenes during the holiday season.
Traditional methods relied on simple tools and readily available ingredients. Modern techniques incorporate specialized tools, such as airbrushes and edible markers, allowing for greater precision and detail. The contrast lies in the level of intricacy and the range of design options available.
Essential Ingredients and Techniques for Perfect Sugar Cookies, Sugar cookies and decorating
Understanding the role of each ingredient is key to achieving the perfect texture and flavor. The balance of flour, butter, sugar, and eggs creates the foundation of a good sugar cookie. Flour provides structure, butter contributes richness and tenderness, sugar adds sweetness, and eggs bind the ingredients together. Variations in the ratio of these ingredients, and the type of sugar used, can significantly impact the final product.
Achieving different textures—chewy versus crispy—depends on the balance of ingredients and baking time. A higher proportion of butter or brown sugar tends to yield chewier cookies, while a lower proportion and a longer baking time will result in crispier ones. Chilling the dough is crucial for preventing excessive spreading during baking, resulting in cookies that maintain their shape and have crisp edges.
Proper mixing techniques, ensuring that the ingredients are thoroughly combined but not overmixed, are essential for a smooth and manageable dough.
Different mixing methods, such as creaming the butter and sugar together or using a stand mixer, can also affect the final texture. Gentle handling of the dough is recommended to avoid developing the gluten too much, which can result in tough cookies.
| Sugar Type | Flavor Profile | Texture Impact | Example Recipe Use |
|---|---|---|---|
| Granulated Sugar | Sweet, clean | Crisp | Classic sugar cookies |
| Brown Sugar | Rich, caramel-like | Chewy | Brown butter sugar cookies |
| Powdered Sugar | Very fine, sweet | Tender, delicate | Shortbread cookies |
| Turbinado Sugar | Slightly caramel-like, with a hint of molasses | Slightly crunchy | Sugar cookie topping |
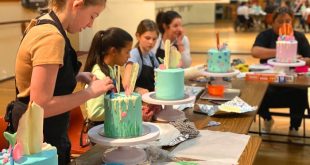
Mastering Sugar Cookie Decorating Techniques and Tools

Source: beyondfrosting.com
Various icing types cater to different decorating needs. Royal icing, known for its firm consistency, is ideal for intricate piping and creating crisp details. Buttercream icing, softer and more spreadable, is excellent for smooth coatings and delicate designs. Glazes, thin and glossy, add a beautiful shine and can be flavored or colored.
Making royal icing involves carefully combining powdered sugar, meringue powder (or egg whites), and liquid. Different consistencies can be achieved by adjusting the amount of liquid. A stiff consistency is best for piping intricate details, while a medium consistency is suitable for flooding larger areas, and a thin consistency works well for writing.
Piping techniques, using various piping bags and tips, allow for creating a wide array of designs. Star tips produce star-shaped swirls, round tips create smooth lines and dots, and leaf tips produce elegant leaves and flowers. Stencils simplify the process of creating repetitive patterns or complex designs, while sprinkles and other decorations add texture and visual interest.
| Technique Name | Description | Tools Needed | Example Design |
|---|---|---|---|
| Wet-on-Wet | Flooding one color, then adding another before it dries. | Piping bags, various tips | Ombre effect |
| Outlining | Creating a border around a design. | Piping bag, small round tip | Floral border |
| Flooding | Filling in a design with icing. | Piping bag, large round tip | Solid colored cookie |
| Writing | Writing words or short messages. | Piping bag, small round tip | Personalized messages |
Designing and Creating Stunning Sugar Cookie Decorations
The principles of design—balance, contrast, emphasis, and unity—apply equally to sugar cookie decoration. Successful designs incorporate a thoughtful arrangement of colors, shapes, and textures. A variety of design themes can be explored, including holiday themes (Christmas, Hanukkah, Easter), seasonal themes (autumn leaves, spring flowers), and character-themed designs (cartoon characters, animals).
Transferring designs onto cookies can be achieved through freehand painting, using stencils to create precise shapes, or even using edible image printers. A winter wonderland theme, for example, might feature snowflakes, snowmen, penguins, and winter trees. The design would incorporate a color palette of blues, whites, and silvers, with various piping techniques to create texture and dimension.
A complex design, such as a detailed winter scene, might involve outlining the elements with royal icing, then flooding the areas with different colors. Adding fine details, like snow drifts and tiny ice crystals, would require a steady hand and the use of fine piping tips. Sprinkles could be added to simulate snow.
Exploring Advanced Sugar Cookie Decorating Techniques

Source: glorioustreats.com
The intricate artistry of sugar cookie decorating, a process involving precise application of icing and meticulous detail work, often requires a dedicated workspace. Finding the ideal environment for this creative pursuit might involve considering factors like available counter space and good lighting, perhaps even prompting a search for a new home, such as those available via this resource for houses for rent in Greenville, SC , if your current kitchen proves inadequate.
Ultimately, the quality of the final product directly correlates with the suitability of the workspace.
Creating 3D sugar cookies involves building up layers of cookies or using modeling paste to sculpt shapes. Realistic textures can be achieved through techniques such as embossing, using textured rolling pins, or applying edible powders to create a rustic look. Edible paints and airbrushing offer precision and control over color application, allowing for subtle shading and gradients.
The intricate artistry of sugar cookie decorating, a process involving precise application of icing and careful design choices, can be surprisingly therapeutic. Finding the ideal environment for this creative pursuit is crucial; perhaps a quiet space in one of the charming houses for rent in Colorado Springs, houses for rent colorado springs , would provide the perfect setting.
The resulting cookies, with their vibrant colors and detailed patterns, then become a testament to the calming effect of such a focused activity.
Adding color can be done through the use of gel food coloring, liquid food coloring, or powdered food coloring. Each method has its own advantages and disadvantages in terms of intensity, vibrancy, and ease of use. A detailed floral arrangement, for example, would require careful color mixing, precise piping, and the use of fine details to create realistic petals and leaves.
Preserving the Freshness of Your Decorated Sugar Cookies
Proper storage is essential to maintain the freshness and appearance of decorated sugar cookies. Airtight containers are recommended to prevent moisture loss and stale flavors. Cookies should be stored in a cool, dry place, away from direct sunlight or heat. Avoiding stacking cookies directly on top of each other helps prevent damage and ensures that the decorations remain intact.
- Airtight containers are best for maintaining freshness.
- Keep cookies in a cool, dry place, away from direct sunlight and heat.
- Use parchment paper between layers to prevent sticking and damage.
- Consider using a cookie storage container with humidity control.
- Avoid storing cookies in the refrigerator, as this can lead to condensation and sogginess.
Q&A
How long do decorated sugar cookies last?
Properly stored in an airtight container at room temperature, decorated sugar cookies can last for up to a week. For longer storage, consider freezing them.
What’s the best way to prevent sugar cookies from spreading too much?
Chill the dough thoroughly before baking. This firms the butter, preventing excessive spreading. Using a cookie scoop for consistent size also helps.
Can I use different types of flour for sugar cookies?
While all-purpose flour is most common, cake flour can create a more tender cookie, while bread flour will result in a chewier texture. Experiment to find your preference.
How do I thin royal icing for different consistencies?
Add water, one drop at a time, to achieve the desired consistency. Start with a small amount and gradually add more until you reach the right fluidity for flooding, outlining, or lettering.